Working with Camunda is great fun for us. Since we deal with it on a daily basis, we also know the extension potential of the Camunda Engine. Therefore, we decided to implement a suite of Camunda extensions, which we call DPM (Digital Process Management). With their help, the following tasks are facilitated:
- Data Handling
- User Interaction
- Integration
- Case Management
- Identity and Access
In this article, you will learn how to set up and use dpmJson in your Camunda application. Feel free to also take a look at our FROX News “Simplified Data Processing in Camunda Processes Thanks to our Latest Development: DPM Json”. In it we summarize the benefits of DPM Json and you can watch the video of our presentation of the tool at CamundaCon 2021.
First steps: set up dpmJson
Handling data in Camunda can be complicated, as it often involves working with different data formats, from HashMaps to ArrayLists to SpinJson objects. To simplify this, we’ve implemented an extension called DPM Json that targets this very issue. Let’s take a look at how this works.
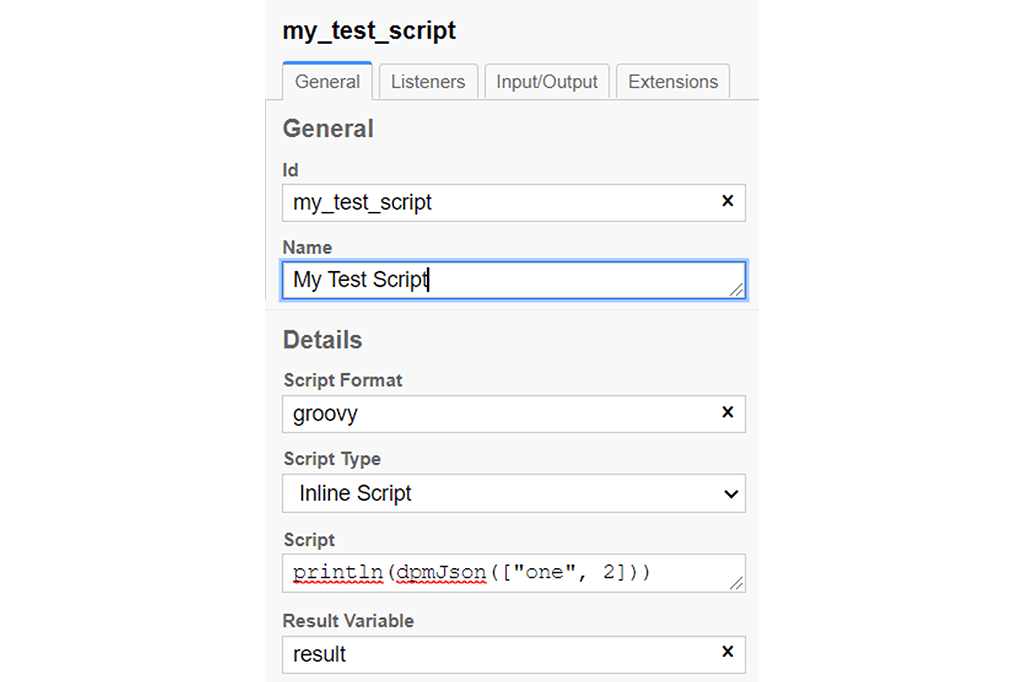
First, download a copy of DPM Json from GitHub. Then, add it to your Camunda application as described in our documentation in the GitHub repository. Then rebuild and launch your application and create a script task that looks like this:
println(dpmJson(["one", 2]))
If you see [“one”, 2] on your console, you have DPM Json set up correctly. If this did not work, try editing your script as follows:
println(dpmJson.wrap(["one", 2]))
If your script worked with the .wrap(…) method, you should add it to every call to DPM Json in your application from now on.
The setup is now complete. Now let’s look at an example.

Combine data types with DPM Json
Let’s see how we can easily combine different data types with dpmJson. For this we go to the GitHub repository and get the first example in the examples folder named dpmJson-attributes-learning-process.bpmn. There we also put the solution with all the approaches presented here.
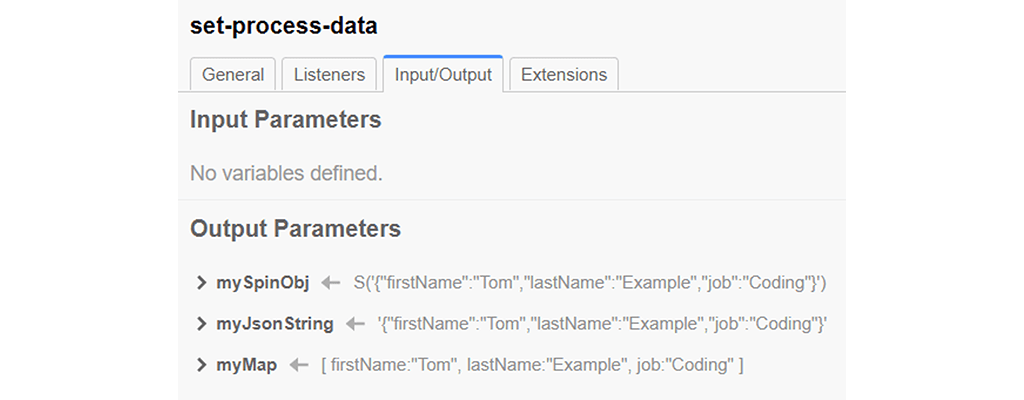
Now we enter the same data object three times in the first task with the first name “Tom”, the last name “Example” and the job “Coding” as we can see on the output variables of the first task. The only difference is the data type that the Camunda engine will serialize the object into:
- mySpinObj will be serialized into a Spin JSON object.
- myJsonString will be serialized into a string
- myMap will be serialized into a LinkedHashMap
As you can imagine, working with all three objects together was quite tedious in the past, as either deserialization or an individual approach had to be implemented for all three data types. This is where DPM Json comes in, as it completely unifies the approach for all common Camunda data types.
We now start this process and take a look at how the Camunda cockpit looks now:

In the following 3 tasks we will solve three tasks. In the first task (TASK 1) you will see a code section containing a line with the following content: // Your code starts here
Below this line we solve the task described in the task title. To do this, we assign our result variable to the variable named “result”. To handle the three different data formats, we simply wrap them with dpmJson and assign them to new variables – and we’re done. The dpmJson universe is open to us from now on.
The code should now look something like this:
def spinObj = dpmJson(mySpinObj)
def jsonString = dpmJson(myJsonString)
def map = dpmJson(myMap)
To combine the attributes of these three objects, we need to create an empty object. This is done by calling dpmJson() without parameters. This gives us an empty JSON object ( {} ) that enables all the functions of DPM Json.
Now we access the attributes (as you may know them from JavaScript) of the three objects and freely assign them to the empty object ( called “result”). The code should look something like this:
result = dpmJson()
result.newFirstName = spinObj.firstName
result.newLastName = jsonString.lastName
result.newJob = map.job
The result is that the variable “result” contains attributes from all three objects and is in Camunda Spin JSON format. The variable “result” is now stored in the process variables with the name “task1”.
If everything worked, you should see the following in your Camunda logs:

In your Camunda cockpit, your variable named “task 1” should look like this:

Now we come to the second task (TASK 2). Here we have to assign not the attributes but the values (Values) to an empty object. This means that we do not assign the result variable dpmJson wrapper as in the previous task, but the actual values. By values we mean primitive data types like strings, integers, floats, nulls, booleans etc.
The only thing we need to adjust at this point is to add the .value() method call to our attributes:
result.newFirstName = spinObj.firstName.value()
result.newLastName = jsonString.lastName.value()
result.newJob = map.job.value()
When we run the process, we will notice that it looks the same in both the Camunda logs and the cockpit as it did in TASK 1. This is intentional, as we wanted the behavior of DPM Json to be the same whether we assign a wrapper or a primitive data type.
Let’s finish the example with the third task (TASK 3). Here we want to create an object with three levels of hierarchy without any other specifications. To do this, in our example, we add a key “one” to the first level, a key “two” to the second level, and a key “three” to the third level. Then we assign the string “hello” as a value to the third level.
In other development environments such a task might involve writing loops, conditions, etc., but with dpmJson it is as simple as the following:
result = dpmJson()
result.one.two.three = “hello!”
As you can see, by concatenating three (previously non-existent) keys and then assigning a value, we have already created an object that looks as expected.

With this example we conclude the introduction to DPM Json. We hope that you will enjoy our open source tool as much as we do and that you will be able to simplify data handling in Camunda from now on. Dive deeper into DPM Json and read how to create complex forms and interaction options directly from a Camunda process!